
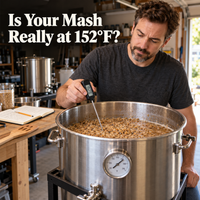
Heat Stratification in All-Grain Brewing
Posted by Dale Hynes on 15th Oct 2026
Why Your Mash Temperature May Be Misleading
You've carefully measured your grain, heated your strike water, and hit your target mash temperature of 152°F. Everything seems to be going according to plan. But when fermentation finishes, your beer is sweeter or drier than expected. What went wrong?
Before blaming your yeast or changing your recipe, consider something you might have overlooked. Is your entire mash actually at 152°F, or is that just what your thermometer is telling you?
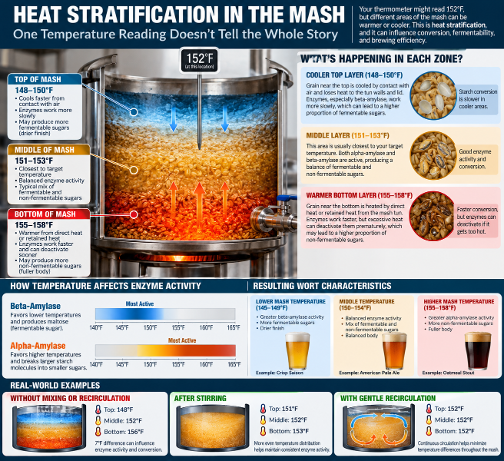
Different areas of your grain bed can maintain different temperatures, a phenomenon known as heat stratification. Significant differences can influence starch conversion, wort fermentability, and brewing consistency.
Fortunately, identifying this problem doesn't require expensive equipment. A few simple observations can help improve consistency, potentially increase efficiency, and save money.
What Is Heat Stratification?
Heat stratification occurs when different areas of your mash maintain different temperatures. Think about heating a thick pot of oatmeal. Without stirring, the bottom becomes hotter while the rest warms more slowly. A mash behaves similarly because crushed grain restricts the natural movement of water.
It's important to distinguish heat stratification from ordinary heat loss.
Heat loss occurs when the entire mash gradually cools. Heat stratification occurs when different locations have different temperatures.
For example, a mash that uniformly drops from 152°F to 149°F experiences heat loss. However, a mash measuring 157°F near the bottom and 148°F near the top has uneven temperature distribution.
Both conditions can occur together. Insulation reduces heat loss, while mixing or recirculation helps distribute heat more evenly.
Why Does Mash Temperature Matter?
During mashing, enzymes naturally present in malted grain convert starches into smaller carbohydrates, including fermentable sugars.
Two important enzymes are alpha-amylase and beta-amylase.
Beta-amylase produces maltose, a readily fermentable sugar, and generally favors lower mash temperatures. Alpha-amylase breaks larger starch molecules into smaller carbohydrates and remains active at higher temperatures.
Both enzymes work across overlapping temperature ranges, but their relative activity influences wort fermentability.
As a general guideline:
- 145 - 149°F: Often promotes a more fermentable wort and drier finish.
- 150 - 154°F: Commonly balances fermentability and body.
- 155 - 158°F: Often produces less fermentable wort, potentially contributing to fuller body.
These aren't rigid rules. Mash duration, pH, grain selection, and yeast characteristics also influence the finished beer.
For example, a brewer making a crisp, dry saison might choose a lower mash temperature, while someone brewing a rich oatmeal stout might mash warmer to encourage more residual body.
When different areas experience substantially different temperatures, enzyme activity may vary, making results less predictable.
How Does Heat Stratification Affect Brewing Efficiency?
Extracting sugars from grain and producing fermentable wort aren't exactly the same thing.
Conversion efficiency describes how completely grain starches become soluble carbohydrates. Wort fermentability describes how much of that material yeast can ferment.
A brewer might achieve the expected original gravity but still produce wort that ferments differently than intended.
For example, two batches of pale ale could both start at 1.050 original gravity, but differences in wort fermentability might contribute to one finishing at 1.010 and another at 1.014, assuming comparable fermentation conditions.
Excessively hot areas can deactivate enzymes prematurely, while cooler regions may require additional conversion time. However, modest temperature differences don't automatically mean poor efficiency.
A Simple Test for Heat Stratification
Before purchasing equipment, try a quick experiment during your next brew day.
After dough in, thoroughly stir your mash and allow the temperature to stabilize. Using a calibrated thermometer, measure near the top, middle, and bottom of the grain bed without touching heated surfaces.
Imagine recording these temperatures:
|
Mash location |
Temperature |
|
Top |
149°F |
|
Middle |
152°F |
|
Bottom |
156°F |
That's a seven degree difference between the top and bottom.
Rather than immediately adjusting the heat, gently stir, allow temperatures to stabilize, and measure again.
If readings become more uniform, uneven heat distribution was likely contributing to the difference. If the bottom remains warmer, investigate your heating method or circulation pattern.
Repeat the measurements 15 to 20 minutes later to determine whether the differences persist.
Practical Ways to Improve Temperature Consistency
- Mix Thoroughly During Dough In
Add crushed grain gradually while stirring to eliminate dry pockets and distribute heat evenly. Proper mixing also prevents dough balls that interfere with starch hydration.
For example, when adding 12 pounds of grain to your strike water, add it in several portions rather than dumping everything in at once.
- Improve Mash Tun Insulation
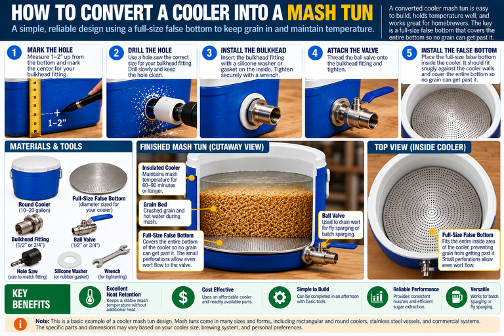
Insulation reduces heat loss through the walls and lid. A converted cooler mash tun can maintain stable temperatures without additional heating equipment.
- Consider Simple Pump-Assisted Recirculation
You don't need an expensive automated system to benefit from recirculation.
A food grade pump rated for hot wort can draw liquid from beneath a false bottom and return it gently to the top of the grain bed through heat-resistant tubing.
For example, a brewer with a kettle mash tun and suitable pump can circulate wort slowly to help distribute heat. Avoid excessive flow that could compact the grain bed, and keep the pump primed.
Recirculation alone doesn't add heat. RIMS systems use controlled heating elements, while HERMS systems use heat exchangers to maintain temperature.
- Avoid Localized Overheating
When applying direct heat, gentle stirring or controlled recirculation helps prevent hot spots beneath the grain bed.
How Better Brewing Efficiency Can Save Money
Improving temperature consistency may reduce ingredient costs when uneven heating limits starch conversion.
Brewhouse efficiency measures how much of your grain's potential extract reaches the fermenter. Higher efficiency means obtaining more usable extract from the same amount of malt.
Consider a homebrewer producing five gallon batches at 65% brewhouse efficiency. If improvements throughout the brewing process increase efficiency to 75%, approximately 13% less grain would be needed to achieve the same original gravity.
For a recipe normally requiring 12 pounds of malt, that's approximately 1.6 pounds saved. At $2 per pound, the savings approach $3.20 per batch.
For commercial breweries using hundreds or thousands of pounds of malt, modest efficiency improvements can translate into substantial savings over time.
However, heat stratification is only one possible contributor to poor efficiency. Grain crush, mash pH, sparging, and wort losses also matter. Eliminating temperature differences won't necessarily increase extract yield if conversion is already complete.
The goal isn't maximizing efficiency at any cost. It's achieving predictable results while using ingredients wisely.
Do You Really Need Perfect Mash Temperatures?
Not at all.
A homebrewer using a simple cooler can produce excellent beer without pumps or automated controls. Commercial brewers may benefit more from precise temperature management because repeatability directly affects production costs.
Minor temperature variations are normal and won't automatically ruin your beer. The important question is whether your process consistently produces the results you intended.
The Takeaway: Put Your Mash Tun to the Test
The next time your thermometer reads exactly where you want it, remember that you're measuring one location, not necessarily the entire grain bed.
Here's a simple experiment for your next brew day. After dough in, measure and record the temperature at the top, middle, and bottom of your mash. Repeat those measurements about 15 to 20 minutes later. If you notice significant differences, try gently stirring and checking again.
Keep a record of these temperatures alongside your original gravity, final gravity, and brewhouse efficiency over several batches. Look for patterns rather than drawing conclusions from a single brew day.
If uneven temperatures persist, consider whether better mixing, improved insulation, or gentle recirculation might help. Make one adjustment at a time so you can determine what actually improves your process.
You may discover that your mash tun is already performing exactly as it should, or identify a simple improvement that saves ingredients, time, and unnecessary frustration.
Better brewing doesn't always require better equipment. Sometimes it simply requires understanding the equipment you already have.